LightBurn for Dummies: A Simple Beginner’s Guide
…if you haven’t bought your laser yet, you can use our verified [OMTech discount code] to save 5% at checkout.
So, you have your shiny new CO2 or Fiber Laser Engraver, and you’re ready to start making amazing things. You get it all set up, turn it on, and then you realize… the machine itself is only half the equation. To bring your creative ideas to life, you need to talk to your laser. You need software.
And in the world of laser cutting, one name stands above the rest: LightBurn.
At first glance, opening LightBurn can feel a little intimidating. There are buttons, windows, and settings everywhere. But don’t worry! This guide is here to be your friendly translator. We’ll break down the basics in simple, easy-to-understand terms. By the end of this article, you’ll not only understand the layout but will have also completed your very first project.

What is LightBurn and Why Do I Need It?
Think of your laser machine as a super-talented artist that is ready to work. LightBurn is the brain that tells the artist exactly what to draw. It’s a powerful piece of software that does three main jobs:
- Design: You can create shapes, text, and even trace images directly within the software.
- Layout: You can arrange your designs precisely where you want them on your material.
- Control: You send the final design to your laser, telling it exactly how fast to move and how much power to use.
While some lasers come with free basic software, LightBurn is a massive upgrade that almost every serious creator uses. It’s user-friendly, incredibly powerful, and gives you the control you need to get professional results.
A Quick Tour of the LightBurn Workspace
Let’s take a look at the main screen. We’ll ignore all the complicated buttons and just focus on the four areas you’ll use the most.
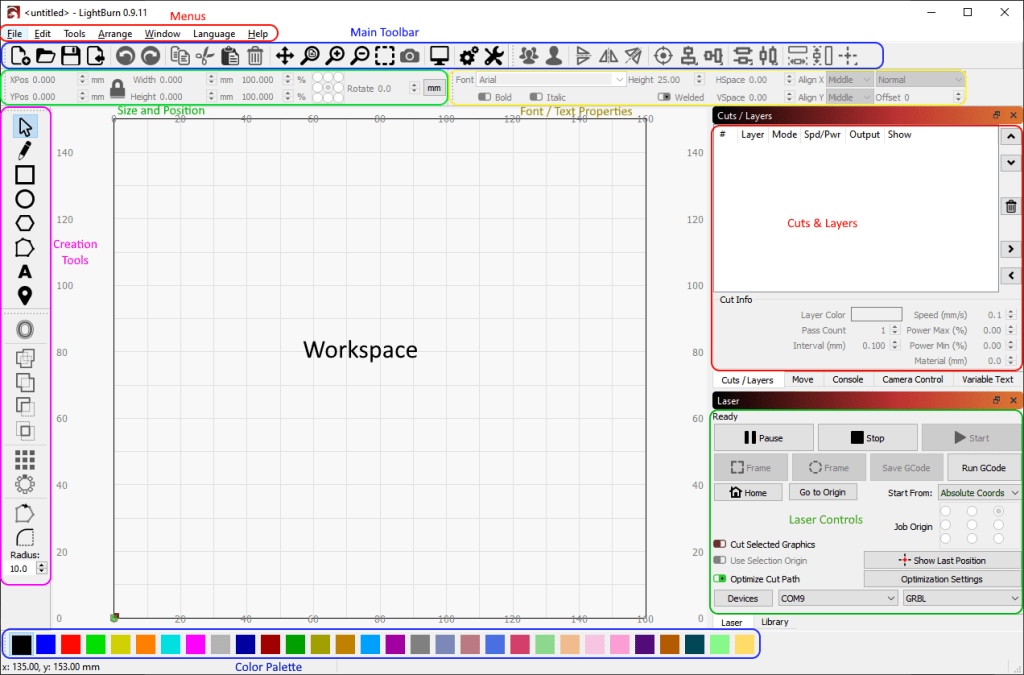
- The Workspace (Your Digital Workbed): The big grid area in the middle is your canvas. This is a digital version of your laser’s work area. Anything you place here is exactly where it will be engraved or cut on your material.
- The Creation Tools (On the left): This is your basic toolbox. You’ll find tools to draw shapes (squares, circles), write text, and the most important tool of all: the Selection Tool (the little mouse arrow) for moving and resizing things.
- The “Cuts / Layers” Window (On the right): This is the most important window to understand. Every color in LightBurn can be given a different job. You might tell your laser that everything black should be filled in (engraved) and everything red should be cut out. This window is where you assign those jobs and set the Speed and Power for each color.
- The Laser Control Window (On the right): This is your mission control for the laser itself. The most important buttons here are:
- Home: Tells the laser to go to its starting position.
- Frame: This is super useful! It makes the laser head move in a square around the outside of your design, showing you exactly where it will be on your material so you can line it up perfectly.
- Start: Sends the job to the laser.
- Stop: Immediately stops the laser.
Your First Project: Engraving a Name on a Coaster
The best way to learn is by doing. Let’s walk through a simple, real-world project step-by-step.
Step 1: Draw Your Shape
Select the circle tool from the left-hand toolbar and draw a circle on your canvas. You can hold down the Shift key to make it a perfect circle. Make it the same size as your real-world coaster (e.g., 4 inches).
Step 2: Add Your Text
Select the text tool (A) and click inside your circle. Type a name or a word like “Welcome.” Use the selection tool (the arrow) to resize it and position it in the middle of the circle.
Step 3: Set Your Layers (The Magic Step!)
This is where you tell the laser what to do.
- Select the circle and click on a color at the bottom of the screen, like the Red (01) swatch.
- Select the text and make sure it’s the Black (00) color.
Now, look at your “Cuts / Layers” window. You’ll see two layers: a black one and a red one.
Step 4: Enter Your Speed and Power
Double-click on the black layer in the “Cuts / Layers” window. A new window will pop up. Set the Mode to Fill (this tells it to engrave). For a 50W laser on a wood coaster, a good starting point might be a Speed of 300 mm/s and a Power of 18%.
Now, double-click the red layer. Set the Mode to Line (this tells it to cut). We don’t actually want to cut the coaster, but we could use this layer to lightly score a circle around the text. Let’s set it to a very low power, like 10%, and a speed of 50 mm/s.
Step 5: Frame Your Job
Place your real coaster inside the laser machine. In LightBurn, press the Frame button. The laser head will move in a square showing the outer boundary of your design. Adjust your coaster until the frame is perfectly positioned on it.
Step 6: Run the Job!
Close the lid on your laser, turn on your exhaust fan, and press the Start button in LightBurn. Watch as your digital design becomes a real-life creation!
Of course, the exact settings you use will always depend on the power of your specific machine and the material you are using. If you’re still deciding which laser is right for you, you can see how all the models compare in our ultimate guide to buying an OMTech laser.
Congratulations! You’ve just learned the fundamentals of LightBurn. It might seem like a lot at first, but like any tool, practice is the key. Keep experimenting with different shapes, settings, and materials. You’ve already completed the hardest part: getting started.

Leave a Reply