
Engraving photorealistic portraits on wood, slate, or acrylic with a laser requires translating subtle shades of gray into a binary signal: laser ON or laser OFF.
In LightBurn, this conversion is handled by Dithering algorithms. Choosing the right dithering mode and line interval determines whether a photo turns into a crisp, detailed portrait or a muddy, overburned silhouette.
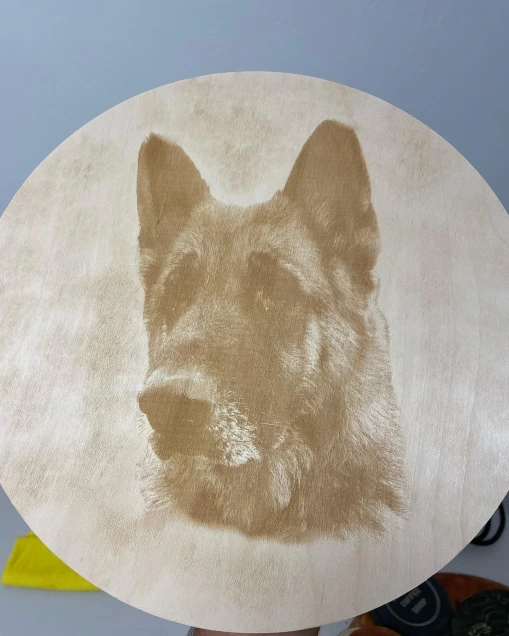
What is Dithering in Laser Engraving?
Laser beams cannot produce half-power shades of gray in real-time across high-speed vector rastering without blurring details.
Dithering solves this by converting continuous gradients into dense dot patterns. Areas with tightly packed dots look dark/deep, while spread-out dots appear light.
Jarvis vs. Stucki vs. Atkinson: Side-by-Side Comparison
| Dithering Mode | Dot Distribution Style | Contrast Level | Best Material Use Cases | Strengths & Weaknesses |
| Jarvis | 12-neighbor error diffusion; high-density blending | Medium / Balanced | Wood (Basswood, Birch), Canvas, Painted Canvas | Best all-around photo detail. Smooth transitions on skin tones; can over-saturate dark backgrounds if DPI is too high. |
| Stucki | Clean 12-neighbor diffusion; slightly crisper edge bias than Jarvis | High / Sharp | Painted Tile, Anodized Aluminum, Black Acrylic | Renders fine lines and text sharply. Slightly faster processing with cleaner edge separation on high-contrast substrates. |
| Atkinson | 6-neighbor diffusion; drops 25% of error bleed to retain bright whites | Highest / Punchy contrast | Slate Coasters, Hardwoods with heavy grain (Oak/Walnut) | Preserves highlights and prevents muddy shadows. Less smooth on subtle skin gradients, but prevents blowout on coarse materials. |
| Floyd-Steinberg | Classic 4-neighbor diffusion | Standard | General graphics and mixed vector/raster art | Can create visible worm-like artifacts in large solid background areas. |
| Grayscale | True varying power (3D depth) | Continuous | 3D Relief Carving (CO2 only) | Not suited for 2D photo portraits; requires heightmap artwork. |
Ideal DPI & Line Interval Settings for Photos
The most common beginner mistake is setting the DPI too high. If the laser’s physical spot size (typically 0.08mm to 0.15mm) is wider than the line interval, the dots will overlap, scorching the material and crushing shadow details.
                 DOT SPACING VS SPOT SIZE

  [ HIGH DPI / OVERLAP ]          [ CORRECT INTERVAL]
   (Dots crush shadows)          (Crisp dot separation)
      ●●●●●●●●●●                      ●  ●  ●  ●  ●
      ●●●●●●●●●●                      ●  ●  ●  ●  ●
     (Muddy Burn)                  (Photorealistic)
Recommended Target Settings by Laser Type
| Laser Type & Wattage | Recommended DPI | Line Interval (mm) | Recommended Mode | Pass Count |
| 10W – 20W Diode (e.g., Atomstack, xTool) | 254 – 300 DPI | 0.100 – 0.085 mm | Jarvis or Stucki | 1 Pass |
| 50W – 60W CO2 (e.g., OMTech Polar) | 300 – 350 DPI | 0.085 – 0.072 mm | Jarvis (Wood) / Atkinson (Slate) | 1 Pass |
| 80W – 100W CO2 Cabinet | 254 – 318 DPI | 0.100 – 0.080 mm | Atkinson (Prevents overburn) | 1 Pass |
Step-by-Step: Preparing and Engraving a Photo in LightBurn
1. Preview Dot Density and Fire – Always run a frame check before firing
Click Preview (Alt + P) in LightBurn and zoom in to confirm that dots look separated and evenly dispersed across facial contours before hitting Start.
2. Import and Crop the Image – Use high-resolution source images (300+ DPI)
Import your image into LightBurn (Ctrl + I / Cmd + I). Right-click the photo and use Crop to cut out busy background clutter, keeping the focus on facial features or key subjects.
3. Invert Image if Necessary – Crucial for dark substrates like slate or black acrylic
When engraving Slate Coasters or White-on-Black materials, the laser creates a light mark where it burns. Double-click the image layer in the Cuts / Layers window and toggle Negative Image to ON so light areas engrave white.
4. Adjust Contrast, Gamma, and Brightness – Fine-tune midtones in the Shape Properties window
Select the image and open the Shape Properties panel. Boost Contrast (+10 to +25) and slightly raise Gamma to pull out hidden facial details from midtones.
5. Assign the Dithering Algorithm and Speed – Double-click the image layer
Set the Image Mode to Jarvis (for wood) or Atkinson (for slate). Set your verified baseline speed and power from the [LightBurn Material Settings Cheat Sheet].
Pro Troubleshooting: Fixing Common Photo Errors
- The Face is Completely Burnt / Black: Your power is too high, or your DPI is above 350, causing laser burn dots to bleed into one another. Drop power by 15% or drop DPI to 254.
- The Image Looks Washed Out: The material needs pre-treatment (such as a thin coat of clear matte spray or mineral oil on slate), or the line interval is too wide (>0.12mm).
- Odd Diagonal Lines Across the Engrave: Ensure Bi-directional Scanning is properly calibrated with reverse interval compensation in Device Settings.
Looking to step up to high-speed CO2 photo engraving? Use partner code
ME5OFFat checkout on [OMTechLaser.com] to save 5% sitewide on desktop Polar units and CO2 systems.
Affiliate Disclosure: Metal Eraser is reader-supported. When you buy through links or use discount codes on our site, we may earn an affiliate commission at no extra cost to you. We only recommend hardware and tools we personally test and stand behind.

Leave a Reply